Picture this: you’re sitting in your kitchen, sipping on a cup of coffee and admiring the lush greenery growing in your Aerogarden. It’s almost like having your own little piece of paradise right at your fingertips.
But what happens when it’s time to transplant those plants into something bigger? That’s where things can get a bit tricky.
Fear not, fellow plant enthusiasts! Transplanting Aerogarden plants doesn’t have to be an intimidating task.
With a few simple tips and tricks, you’ll be able to transfer your beloved herbs and veggies from their cozy pods into larger pots or containers without harming them in the process.
So grab another cup of coffee (or tea), put on some music, and let’s dive into the world of Aerogarden transplanting together!
Understanding Your Aerogarden’s Growth Cycle – Initial Stages of Going from Pod to Pot!
Are you ready to take your hydroponic plant-growing skills to the next level? Transplanting aerogarden plants can be a great way to expand your indoor gardening horizons.
But before we get into the specifics of transplanting, let’s first understand the growth cycle of an aerogarden.
Starting with seedlings, an aerogarden provides optimal conditions for germination and early growth stages. Once sprouted, plants will grow rapidly and produce bountiful yields through a process known as ‘aeroponics.’
After months of enjoying fresh herbs or vegetables from your aerogarden harvest, it may be time to consider transplanting hydroponic plants in order to continue their growth cycle outside of the system.
So how do you know when it’s time for a change? Let’s dive deeper into identifying when your plants need transplanting.
How to Identify When You Need to Transplant Your Plants – Know the Reasons to Transplant Your Aerogarden Plants to Soil
Once you’ve successfully grown your aerogarden plants from seedlings, it’s important to keep an eye on their growth and health.
One of the key aspects of maintaining healthy hydroponic plants is knowing when they need to be transplanted.
There are a few reasons why you might want to transplant your aerogarden plant – perhaps the roots have outgrown their current container, or maybe you’re looking to increase nutrient absorption by moving them into fresh soil.
One telltale sign that your plant is ready for transplantation is if you notice its leaves turning yellow, wilting, or falling off altogether.
This could indicate root damage due to overcrowding or lack of nutrients in the existing soil.
Also, if your plant has stopped growing vertically despite receiving ample light and water, it may be time to consider transplanting it into a larger container with more space for root expansion.
By identifying these signs early on and taking action promptly, you can ensure that your aerogarden plants continue to thrive and produce bountiful yields.
As we move on to choosing the right container for transplanting our aerogarden plants, it’s important to remember that not all containers are created equal.
Depending on the size of your mature plant, optimal drainage requirements, and available space in your grow area, there are several factors that will determine which type of container will work best for your needs.
Let’s take a closer look at some options!
Choosing The Right Container – Time to Transplant Hydroponic Plants to Soil in the Garden!
Now that you have decided to transplant your aerogarden plants, it’s important to choose the right container. The type of pot you select will determine how well your plant thrives in its new environment.
You can either use a traditional pot or a pod specifically designed for aerogarden plants. If you opt for a traditional pot, ensure it has drainage holes at the bottom to allow excess water to escape.
And, fill the pot with soil from the aerogarden and then add some fresh potting soil on top.
On the other hand, if you decide to use a pod, simply remove it from the aerogarden device and place it directly into the new container filled with fresh potting soil.
With the correct container selected, you will be one step closer to successfully transplanting your aerogarden plants.
Selecting The Right Soil Mix – Preparing the Soil!
There’s a common misconception that the same soil mix used in traditional gardening is suitable for transplanting aerogarden plants. However, this couldn’t be further from the truth!
Unlike outdoor plants, aerogarden plants thrive in nutrient-rich water instead of soil. Therefore, it’s crucial to select the right soil mix when you’re planning to transplant your aerogarden plants into a new container.
When selecting potting soil for transplanting aerogarden plants, look for one that contains high-quality nutrients and organic matter.
The ideal soil should also have excellent drainage properties to ensure proper oxygenation and prevent root rot. Mixing perlite or vermiculite with the potting soil can help improve its texture and enhance drainage.
With the right soil mix, your transplanted aerogarden plants will have access to all the necessary nutrients they need to grow healthy and strong roots.
Now it’s time to prepare the new container before transplanting them.
Preparing The New Container
Now that you have selected the right soil mix, it is time to prepare the new container for transplanting your aerogarden plants.
First, choose a container that is large enough to accommodate the size of your plant’s root system. Remember that when transplanting, you want to give your plant room to grow and thrive.
Once you have chosen your container, add high-quality potting soil to the bottom and create a small mound in the center where you will place your plant.
Carefully remove your aerogarden plants from their current home and gently loosen any tangled roots before placing them in the new container.
After covering with more soil, press down firmly around the base of each plant and then water thoroughly. It is important to keep the soil evenly moist during this process so be sure to check regularly and water as needed.
When removing your aerogarden plants, don’t damage or break any stems or leaves.
By following these steps for preparing the new container and properly transplanting your plants, you can ensure they continue to thrive in their new environment.
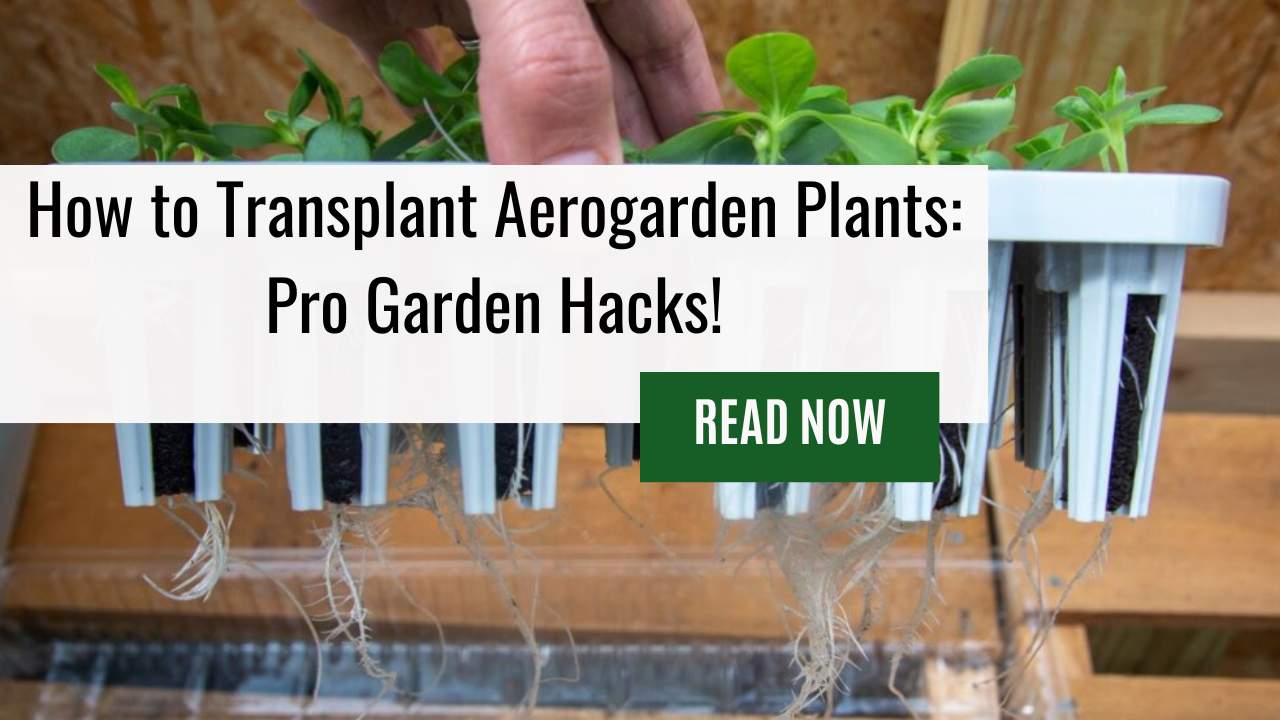
Removing the Aerogarden Plants – Time to Clean Your Aerogarden!
The first step is removing the Aerogarden itself. Carefully unplug the unit and remove any remaining pods or baskets from the system.
It’s important to make sure that no roots are left behind in the water basin, as this can cause issues later on.
Next, it’s time to clean your Aerogarden before transplanting your plants. Use a non-toxic cleaner and scrub down all surfaces of the unit, making sure to pay close attention to areas around where the pods were located.
This will help prevent any potential disease or mold from developing once you’ve transplanted your Aerogarden plants into their new home.
With these steps completed, you’re now ready for separating the roots!
Separating The Roots – Way to Transplant Aerogarden Pods
Now it’s time to separate the roots.
This step is crucial as it allows each plant to grow and thrive in its own space.
Keep in mind that if you’re transplanting multiple seedlings to the soil, then be careful when separating the roots so they don’t get tangled up with one another.
To begin, gently loosen the soil around the base of your aerogarden seed by using a small trowel or spoon.
Once you’ve done this, use your hands to carefully remove any excess dirt from the root ball. Be sure not to damage any of the delicate roots during this process.
After removing most of the soil, take a pair of sharp scissors and cut through any large roots that are growing together.
Doing this will help reduce stress on both plants during transplantation and ensure they receive adequate nutrients once replanted into the new soil.
With your plants’ roots separated, you can now move on to pruning them for optimal growth.
Pruning Your Plants
Congratulations on successfully transplanting your Aerogarden plants! Now that you have these beautiful hydroponic plants, it’s time to ensure they continue growing strong and healthy.
One essential step in maintaining the health of your Aerogarden plants and herbs is pruning them regularly. Pruning your plants not only promotes growth but also helps maintain their shape and size.
When pruning, be sure to remove any yellow or brown leaves as well as any stems that are overcrowding others. Furthermore, prune off any blooms during the vegetative stage to encourage more foliage growth.
By taking the time to properly prune your Aerogarden plants, you’ll help them reach their full potential and keep them looking great for years.
As important as pruning is, planting your Aerogarden plants correctly is just as crucial for their survival.
In the next section, we will discuss how to plant your Aerogarden plants effectively so they can thrive in their new environment.
Planting Your Aerogarden Plants
After successfully pruning your plants, you may want to expand your Aerogarden environment and transplant them into the soil.
Before doing so, it’s important to take note of the nutrients that these plants get from the Aerogarden system; they are not used to getting their nutrition from the soil.
Therefore, before transplanting your plants, make sure that you have properly prepared the soil so that it is rich in all necessary nutrients.
To prepare the soil for transplanting, ensure that you use a nutrient-rich potting mix. It should be packed with organic matter and contain enough nitrogen, phosphorous, and potassium to promote healthy growth.
You can also add compost or other natural fertilizers for an extra boost.
Once the soil is ready, gently remove each plant from its pod and carefully place it in the new container. Make sure not to damage any roots while transferring them!
Once transplanted, monitor their progress closely as this will be a big change for your aerogarden plants!
Watering Your Transplanted Plants
As you have successfully transplanted your Aerogarden plants into a new environment, it’s crucial to take care of them properly.
One of the essential steps is watering the plants. To do this efficiently, imagine yourself as a gardener who knows exactly how much water each plant needs for optimal growth.
Watering should be done regularly and consistently, but not excessively. Overwatering can harm the roots and deprive the plants of oxygen.
Monitor your plants’ soil moisture by touching it with your finger or using a moisture meter.
Expose the plants to 14-16 hours of light daily and keep the soil moist but not soaked.
This will ensure that they receive enough nutrients from the soil while also maintaining good drainage. In doing so, you’ll witness vibrant foliage and bountiful yields in no time!
Now let’s move on to providing adequate lighting for your newly transplanted Aerogarden plants.
Providing Adequate Lighting
Now that you have transplanted your aerogarden plants, it’s time to focus on providing adequate lighting.
As you expose plants to a new environment, they require an adjustment period to thrive. In the case of transplanting, this means giving them enough light to grow strong and healthy roots.
The first thing you want to do is ensure that your newly transplanted plants are getting enough light exposure.
Aerogarden environments typically come equipped with LED lights that provide sufficient lighting for growing herbs and vegetables indoors.
However, if you’ve moved your plants into a different setup or location, make sure they’re still receiving the same amount of light as before.
Adjust the height of your light source accordingly so that it’s not too close or far from your plants.
With proper lighting in place, your transplanted aerogarden plants will be well on their way toward thriving in their new surroundings!
As you move forward caring for your newly transplanted aerogarden plants, there are additional steps you can take to ensure their success.
Keep reading to learn more about how often you should water them and what nutrients they need in order to grow strong and healthy!
Caring For Your Newly Transplanted Aerogarden Plants
Caring for your newly transplanted aerogarden plants requires attention and dedication.
As you may know, hydroponic gardening is a bit different from traditional soil-based gardening. Your plants cannot adapt as quickly to their new environment when they are first introduced to the system.
To ensure that your plants thrive, make sure to keep an eye on their growth patterns and adjust accordingly. This may include adjusting the light or water levels depending on each plant’s needs.
Besides, be mindful of any signs of stress or disease in your plants and address them promptly.
With proper care and attention, your newly transplanted aerogarden plants will grow strong and healthy in no time!
Frequently Asked Questions
Can I Transplant All Types Of Plants From My Aerogarden?
The answer is yes and no. While some plants may thrive when transplanted, others may struggle and even die.
So it’s important to do your research beforehand and determine which plants will fare well outside of the controlled environment of your Aerogarden.
But with a little bit of knowledge and patience, you can successfully transplant many types of plants from your Aerogarden and continue to enjoy their growth for years to come.
Do I Need To Use A Different Type Of Soil Mix When Transplanting My Aerogarden Plants?
The answer is yes! Unlike traditional gardening, aerogardens rely on hydroponic technology and do not require soil. Therefore, using regular potting soil can cause drainage problems and damage the roots of your plants.
Instead, opt for a specialized hydroponic growing medium that provides the necessary nutrients and support while allowing water to flow freely through the system.
With these simple tips in mind, you’ll be able to successfully transplant your aerogarden plants and continue enjoying fresh herbs and vegetables all year round.
How Long Should I Wait Before Transplanting My Aerogarden Plants?
Imagine you’re a chef preparing a delicious meal. You know that timing is everything – if you take the dish out of the oven too soon, it won’t be fully cooked and won’t taste as good.
The same goes for transplanting your Aerogarden plants. Before making any moves, it’s important to ask yourself: how long should I wait?
Rushing into transplanting can shock your plant’s delicate root system and cause damage. It’s crucial to give them enough time to establish themselves in their current environment before transferring them elsewhere.
So sit tight, exercise patience, and let your plants grow strong roots before moving them to new soil or containers.
Can I Use Any Type Of Container For Transplanting?
Yes, you can use any type of container for transplanting your aerogarden plants!
However, it’s important to keep in mind that the size and shape of the new container should be appropriate for the plant.
For instance, if you’re transplanting a tomato plant, you’ll need a larger pot than if you were transplanting basil.
Moreover, make sure that the container has drainage holes so excess water can escape.
With these key factors in mind, feel free to get creative with your choice of container – just remember to keep your plants’ needs at the forefront of your decision-making process.
Happy planting!
What Are Some Signs That My Aerogarden Plants Need To Be Transplanted?
Transplanting is an essential step in maintaining healthy and thriving plants, but how do you know when it’s time?
Look for signs like roots growing out of drainage holes, stunted growth, or yellowing leaves.
As a plant parent, mastering the art of transplantation will not only benefit your current crops but also ensure future success with new ones.
Summing Up
In conclusion, transplanting your Aerogarden plants can be a rewarding and fulfilling process. It’s like giving them a new lease on life, allowing them to spread their roots and thrive in a larger space.
Just imagine the joy of seeing those tiny seedlings grow into strong, healthy plants right before your eyes.
However, it’s important to remember that each plant has its own needs and requirements in terms of transplantation.
By following these guidelines and listening closely to your plants’ signals, you’ll be able to give them the best possible chance for success in their new environment.
So roll up your sleeves, grab some soil mix and containers, and let’s get started!


Leave a Reply