Are you tired of constantly worrying about whether your plants are getting enough water?
Do you struggle to keep up with a regular watering schedule, or find yourself forgetting altogether?
If so, then plant watering globes may be just the solution you need!
These handy devices allow you to easily and efficiently keep your plants hydrated without having to constantly monitor them.
But how do you fill plant watering globes properly for optimal results?
In this article, we’ll walk you through everything you need to know about filling these nifty little tools, from choosing the right kind of globe for your needs to ensuring that your plants get just the right amount of water every time.
With our expert tips and tricks, you’ll soon be well on your way to becoming a master gardener!
Understanding Plant Watering Needs to Use Watering Globes
Have you ever struggled with keeping your plants healthy and hydrated?
Do you find yourself forgetting to water them or overwatering them, leading to their demise?
Well, fear not! With the help of watering systems such as self-watering bulbs or watering globes, you can easily maintain your plant’s watering needs without any hassle.
Understanding a plant’s watering needs is crucial for its growth and survival. Proper hydration helps in photosynthesis, nutrient uptake, and overall health.
Different types of plants have different requirements in terms of water intake. Some prefer moist soil while others thrive in drier conditions.
By using watering globes, you can ensure that each plant receives an adequate amount of water based on its individual needs.
In the following section, we will delve into how to choose the right type of watering globe for your specific plant species.
Choosing The Right Watering Globe or Watering Bulb
Now that you understand your plant’s watering needs, it’s time to choose the right watering globe.
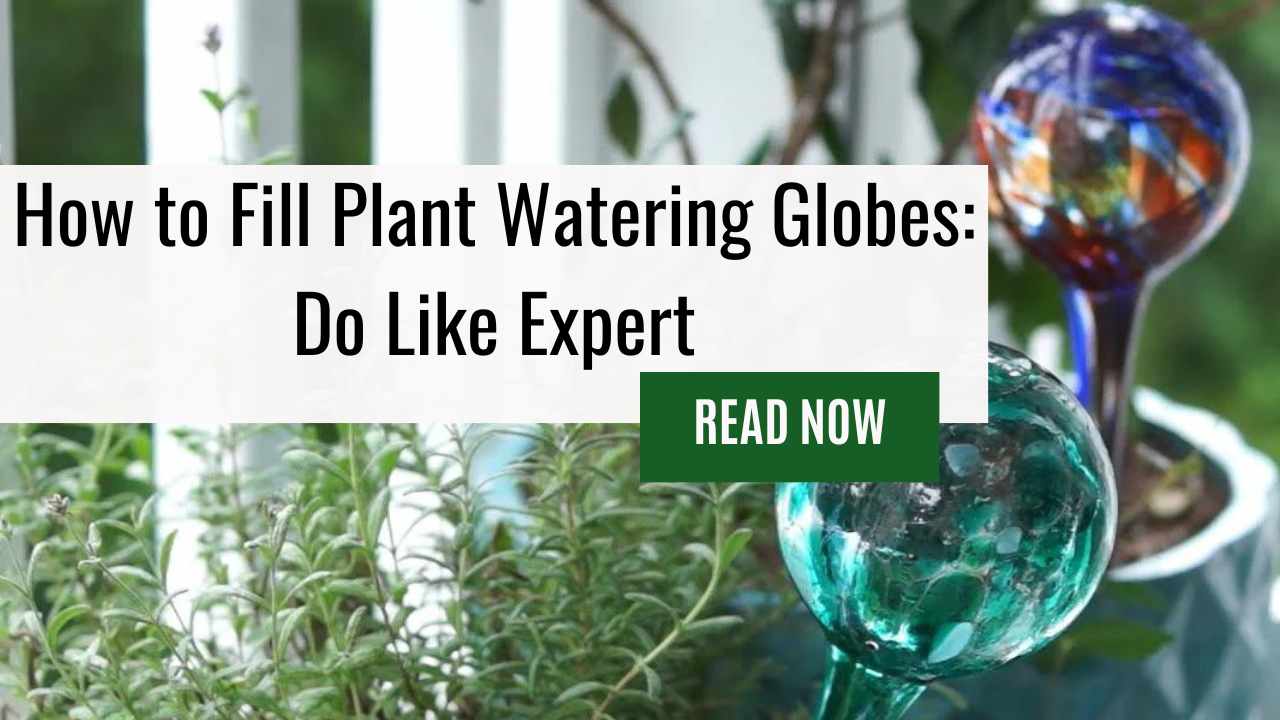
There are many types of globes available in different sizes and materials. Some watering globes are made from glass, while others are plastic or ceramic.
When choosing a watering globe, consider the size of your plant and how much water it needs.
To fill the globe, first gather your materials such as a funnel, water source, and the chosen watering globe.
Place the funnel into the opening at the top of the globe and slowly pour water into it until it is full. Be careful not to overfill as this may cause spillage when inserting it into your plant soil.
Once filled, gently insert the stem of the globe into moist soil near the roots of your plant. The globe will release water slowly over time providing consistent moisture for optimal plant care.
Gathering Your Materials
Before you start with your plant care routine, it’s important to gather all the necessary materials. For filling watering globes, you’ll need a few things: a watering globe (of course), water, and a pencil.
Firstly, make sure that you have enough watering globes for each of your plants. It’s always better to overestimate than underestimate as for taking care of your green friends.
Once you’ve gathered all the needed tools, use a pencil to create small holes in the soil around your plant. This will help the water from the globe seep into the roots more efficiently.
With everything ready, let’s begin preparing the watering globe!
Preparing The Watering Globe – A Cruical Step of How to Fill Plant Watering Globes
To ensure proper plant care, it is essential to prepare the watering globe before using it.
First, clean the globe thoroughly with warm water and mild soap to remove any dirt or debris. Rinse it well and let it dry completely.
Next, check that your watering globe has a long stem that will reach deep into the soil of your potted plant. If not, you may need to purchase a longer one.
Once your globe is clean and ready to use, you can move on to filling it with water.
Filling The Globe With Water – See How Watering Globes Work!
So, you’re ready to fill your brand-new watering globes. and take the first step towards becoming a self-proclaimed plant parent.
Congratulations on joining the club! It’s time to put those green thumbs to work and give some much-needed water to your plants.
First things first, make sure that the soil around your plants is moist before inserting the globe. This will ensure that there is enough moisture for your plant while also preventing any air pockets from forming in the soil.
Once you have checked this off of your list, it’s time to move onto filling the globe with water.
To start, hold the globe upside down and remove the cap from its spout. Using a funnel or steady hands, pour water into the opening until it reaches almost all the way up to the top.
You don’t want to overfill it as this may cause it to leak or not function properly. Once filled, replace the cap securely onto its spout and turn the right side up.
Now that you’ve got one watering globe down pat, repeat these steps for each additional globe you’d like to use in order to provide consistent water care for your beloved plants!
But wait – how do we insert these helpful little buddies into our precious pots?
Inserting The Globe Into The Soil
Now that you have filled your plant watering globe with water, it’s time to insert it into the soil. This step is crucial in ensuring that your plants receive a steady supply of water for several days.
To begin, make sure the soil around your plant is moist before inserting the globe. If the soil is dry, add some water to it beforehand.
Next, take the filled globe and gently press it into the soil near the base of your plant. Make sure not to push too hard as this may damage the roots.
The opening of the globe should be facing up and slightly tilted towards the stem of your plant to ensure maximum efficiency.
Once inserted, give it a gentle wiggle to ensure that it’s secure in place. With that done, you can now breathe easy knowing that your plants will remain hydrated even when you’re away from home!
Now that you’ve successfully inserted the globe into the soil, it’s important to periodically check its water level to ensure optimal hydration levels for your plants.
A good way to do this is by observing how quickly or slowly water flows out of the globe over time.
When checking, remember always to refill if necessary so that your plant remains healthy and happy all year round!
Checking The Watering Globe’s Water Level
Once you have filled your watering globe and placed it in your plant’s soil, it is important to regularly check the water level.
This will ensure that your plants are receiving proper hydration and prevent them from becoming overwatered or dehydrated.
To check the water level of your watering globe, simply examine the glass bulb. If the bulb is empty or nearly empty, it is time to refill it with water.
On the other hand, if the bulb is still full or partially full, there may be enough water for several more days depending on factors such as humidity levels and plant care routines.
By checking the water level regularly, you can maintain a healthy balance of moisture for your plants and avoid any potential issues caused by improper hydration.
As you become familiar with checking the water level of your watering globes, you may find that adjustments need to be made based on individual plant needs.
In the subsequent section about adjusting the watering globe as needed, we’ll explore how to make these modifications without disrupting your plant’s growth cycle.
Adjusting The Watering Globe As Needed
After checking the water level of your watering globes, it’s time to fill them up with water. Filling these globes is as easy as pouring liquid into a bottle or vase.
Simply take off the cap and use a funnel to pour in clean water until it reaches the top. Remember not to overfill the globe, leaving some space for air to circulate.
Once you have filled all your watering globes with water, it’s time to adjust their positions around your plants.
Make sure that each globe is securely placed near the roots of your plant so that they can receive adequate water supply throughout the day.
Adjusting the position of each globe may require a bit of trial and error at first, but once you find the perfect spot, your plants will thrive.
Cleaning And Maintaining Your Watering Globes
Keeping your water globes clean and properly maintained is essential for the health of your plants. Neglecting to do so can cause bacteria and mold to grow, which can harm or even kill your plants.
Luckily, cleaning and maintaining your watering bulbs is a simple process that you can easily incorporate into your plant care routine.
The first step in cleaning your self-watering bulbs is to empty any remaining water from them.
Next, fill the glass plant watering globes with warm soapy water and let them soak for about 10-15 minutes.
After soaking, use a soft-bristled brush or cloth to gently scrub the inside of the bulb until all residue has been removed.
Rinse thoroughly with clean water before allowing it to dry completely before refilling it.
It’s also important to check on the condition of the globe periodically. If there are any cracks or chips, replace them immediately as they may leak out water damaging both your furniture and floors!
Troubleshooting Common Issues
Did you know that using self-watering globes can actually reduce water waste and save up to 50% of your watering time?
Not only do these handy devices keep your plants watered consistently, but they also prevent overwatering and promote healthy root growth by allowing the soil to dry out between waterings.
However, it’s important to know how to fill them properly to ensure optimal performance. To fill your watering globes, first, determine the appropriate size for each plant based on its water needs.
Next, fill a container with room-temperature water and place one end of the globe into the water while covering the opening at the top.
The globe will naturally start filling up as air bubbles escape through the bottom until it reaches full capacity.
Make sure not to overfill the globe or else it may leak when inserted into the soil. Check the water level in both the globe and plant regularly, especially during hot weather conditions or if you have recently repotted your plant.
If you encounter any issues such as leaks or uneven watering, don’t fret! These common problems are easily troubleshot by adjusting the placement or checking for cracks in the globe.
With proper care and maintenance, self-watering globes can be an efficient tool for keeping your plants happy and healthy.
In our next section, we’ll share some tips for successful plant care with watering globes so that you can become a pro at indoor gardening.
Tips For Successful Plant Care With Watering Globes
Watering your plants can be a hassle, especially if you have several of them. But with the help of watering globes, plant care becomes more manageable and effortless.
Watering bulbs or self-watering bulbs are some examples of these innovative watering systems that allow you to keep your plants hydrated without having to water them manually every day.
To use a watering globe, simply fill it up with water and insert it into the soil near the roots of your plant. The globe releases water as needed, depending on how dry the soil is.
This ensures that your plants get just the right amount of moisture at all times.
With this simple trick, you’ll no longer have to worry about overwatering or underwatering your precious greens.
Plus, it gives you peace of mind knowing that your plants are well taken care of even when you’re away from home for an extended period.
Frequently Asked Questions About Plant Watering Globes.
Are you new to using plant watering globes or have some questions about them? Here are some frequently asked questions and their answers.
Q: How do I know when my self-watering plants need to be watered again?
A: Check the water level in the globe. It should be visible through clear glass or plastic. If it’s low, fill up the globe with water until it reaches the top of the stem.
Remember to check regularly as different plants have different needs for water!
Q: Can I use tap water to fill plant watering globes?
A: Yes, but keep in mind that if your tap water is high in minerals, it can build up over time and affect your plant health.
Using distilled or filtered water is a good option to prevent this from happening. And, make sure not to overfill the globes as excess water may cause root rot or other damage to your plants.
With these tips in mind, enjoy watching your plants thrive with help from watering globes!
Frequently Asked Questions
Can I Use Tap Water To Fill My Watering Globe?
Yes, you can definitely use tap water to fill your watering globe. It’s a quick and easy solution for those who want to keep their plants hydrated without the hassle of daily watering.
However, it is important to note that the quality of tap water may vary depending on where you live.
Some areas have higher levels of minerals or chemicals in their water supply which could potentially harm your plant over time.
If this is a concern, consider using filtered or distilled water instead. With just a few simple steps, filling your watering globe with either type of water will ensure that your plant stays healthy and happy!
How Often Do I Need To Refill My Watering Globe?
How often you need to refill your watering globe depends on various factors, such as the size of the globe and the plant’s water requirements.
As a rule of thumb, once a week is sufficient for most plants. However, during hotter months or if your plant has higher water needs, you may have to fill it up more frequently.
It’s always best to monitor your plant’s soil moisture level before refilling the globe to avoid overwatering.
Remember that using tap water can cause mineral buildup in your globes, so make sure to clean them regularly and consider using distilled water instead.
With some trial and error and attentiveness toward your plants’ needs, mastering the art of watering with globes will become second nature!
Can I Use Watering Globes For All Types Of Plants?
Using watering globes can be a great way to ensure your plants stay hydrated, but it’s important to know which types of plants are suitable for this method.
While most indoor houseplants will benefit from using watering globes, outdoor and larger plants may not receive enough water through these devices alone.
It’s always best to check the specific needs of each plant before relying solely on watering globes.
With that said, if you’re looking for an easy and convenient way to keep your indoor garden thriving, watering globes are definitely worth considering!
How Deep Should I Insert The Watering Globe Into The Soil?
As for using watering globes for your plants, one important thing you need to know is how deep to insert them into the soil.
While this may vary depending on the size of your plant and its root system, as a general rule of thumb, you should aim for a depth that allows the globe’s stem to reach at least an inch or two below the surface.
This will ensure that water can easily flow from the globe into the soil where your plant needs it most.
So if you want to keep your greenery happy and healthy all year round, make sure you get familiar with how deep to insert those watering globes!
Can I Leave My Watering Globe In Place During Rainy Weather?
The answer is obvious – why expose something to unnecessary moisture when you can prevent it?
Similarly, if you have watering globes inserted into your plants’ soil and there’s rain forecasted, remove them until the weather clears up.
Leaving them in place could overwater your plants and lead to root rot or other fungal diseases.
As much as we want to make our lives easier by using technology, sometimes nature has its way of reminding us that simplicity is key.
Summing Up
In conclusion, watering globes are a convenient and effective way to keep your plants hydrated.
It’s important to note that tap water can be used to fill the globe, but it’s recommended to let it sit out for a few hours before use as the chlorine in tap water can harm plant roots.
Interestingly, did you know that over-watering is one of the most common mistakes made by indoor gardeners?
By using a watering globe, you can avoid this mistake and ensure that your plants receive just the right amount of moisture they need.
Remember to refill your watering globe every 7-14 days depending on how quickly your soil dries out and insert it at least two inches deep into the soil.
With proper use, your plants will thrive and enjoy their new source of hydration!


Leave a Reply