Are you tired of constantly worrying about whether or not your plants are getting enough water?
A self-watering planter may be just what you need to alleviate that stress and ensure healthy growth for your beloved greenery.
Setting up a self-watering planter may seem intimidating at first, but with the right guidance and tools, it can be a simple and satisfying process.
In this article, we will walk you through everything you need to know in order to set up your own self-watering planter so that you can sit back and watch your plants thrive without any extra effort on your part.
Get ready to become a master of plant care!
Choosing The Right Self Watering Planter
Choosing the right self-watering planter is crucial to ensure that your plants thrive. These planters have a water reservoir at the bottom, which allows for consistent and adequate watering without overwatering.
When selecting a self-watering planter, there are several factors to consider. Firstly, you need to determine what type of plant you want to grow in your planter.
Different types of plants require different pot sizes and depths.
Also, some plants prefer more moisture than others, so it’s necessary to choose a container with an appropriate wicking system to keep the soil consistently moist.
Once you’ve decided on the type of plant, select a self-watering planter with enough space for roots to grow comfortably while providing sufficient support for growth.
Selecting The Best Potting Soil for Self-Watering Container
Choosing the right potting soil is crucial for the success of your self-watering planter. The type of soil you use will directly affect how much moisture it can retain and how well your plant roots grow.
Since these planters are designed to water plants automatically, using a high-quality potting mix that retains water for long periods is essential.
When selecting soil, look for options that have good drainage properties while still retaining moisture in the soil.
Avoid using garden soils or heavy clay-based soils as they tend to compact easily, leading to poor root growth and inadequate aeration.
Instead, opt for lightweight mixes that contain organic matter like peat moss or coconut coir, which help hold onto moisture without becoming too dense.
By selecting the right potting soil, you’re setting up your self-watering planter and its future occupants for healthy development and longevity.
Picking the Perfect Plants for Self-Watering Pots
After selecting the best soil for your self watering planter, it’s time to move on to choosing the perfect plants.
In terms of self-watering planters or self watering pots, it’s important to remember that they work differently than traditional planters.
The water supply is stored separately from the plant roots and released slowly over time as needed.
When picking plants for your self watering planter, consider their size and growth rate. Look for plants with smaller root systems that won’t outgrow the container too quickly.
Besides, choose plants that have similar moisture needs so they can thrive together in the same planter.
Some great options include succulents, herbs like mint and basil, and small flowering plants like pansies or petunias.
With the right selection of perfect plants, you’ll be well on your way to a thriving self watering garden!
As you prepare your new self watering planter for use, make sure to follow any manufacturer’s instructions carefully.
Fill up the reservoir with water before planting and allow it to settle into the soil overnight if possible. This will give the soil a chance to fully absorb all of the water before adding in your chosen plants.
Once everything is planted, check regularly to ensure that there is always some moisture present in the reservoir – this will help keep your perfect plants healthy and happy!
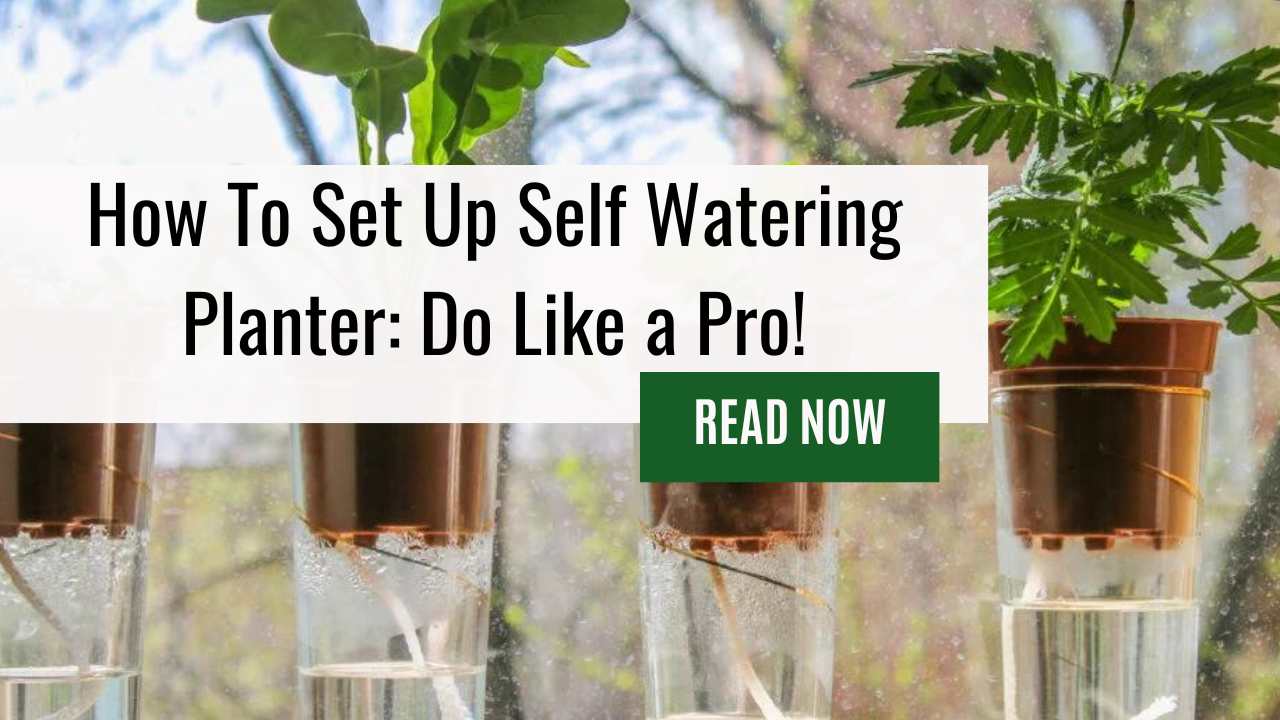
Preparing the Planter for Use – Know How Self-Watering Planters Work and Know the Terms: Fill Tube, Wick, Capillary Action!
To start setting up your self-watering planter, make sure the fill tube and wick are properly placed inside the planter.
The fill tube is used for adding water to the reservoir, while the wick extends from the bottom of the pot into the soil, allowing capillary action to draw moisture upward.
Before filling the planter with soil or plants, it’s important to add the water reservoir. This component sits at the bottom of the planter and holds excess water not absorbed by the soil.
Make sure there are no cracks or leaks in this piece before continuing with the setup.
Once confirmed, place it securely in its designated spot within the planter and proceed with adding soil and plants as desired.
With these simple steps completed, your self-watering planter is now ready for use!
Adding the Water Reservoir to the Self Watering Pot – Fill the Water Reservoir!
Now that you have created a self watering planter, it’s time to add the water reservoir. The reservoir will hold the excess water and prevent your plants from drowning or being overwatered.
It’s important to fill the reservoir with enough water so that your plant roots can absorb water as needed.
To begin adding the reservoir, locate the designated area at the bottom of your planter where it should be placed. You’ll want to make sure there are no leaks by testing it out before inserting it into the planter.
Once confirmed, carefully insert the reservoir into place making sure it fits snugly against all sides of the container. Now you’re ready to fill up the reservoir with water!
Remember not to overfill as this may cause damage to your plants or overflow onto any surrounding surfaces.
As we move on to inserting the watering tube in our next section, keep in mind that properly filling your self watering planter’s reservoir is essential for keeping your plants healthy and hydrated without too much effort on your part.
With this step done correctly, you’re well on your way towards mastering this DIY project.
Inserting the Watering Tube – The Crucial Step of How to Set Up Self Watering Planters
Assembling a self-watering planter can be a taxing task, but with the right tools and guidance, it’s an achievable feat.
Once you’ve assembled the base of your planter, it’s time to insert the watering tube; this step is crucial in ensuring that your plants receive adequate water without any extra effort on your part.
To begin, locate the fill tube included in your kit. This should have a cap attached to one end and will serve as the main source for dispensing water into your planter.
Next, place the fill tube into the designated hole at the top of your planter.
Ensure that the tube reaches all the way down to where you want to store excess water; typically, this space is located beneath a false bottom or reservoir within the planter itself.
With everything aligned properly, gently push down on the tubing until it firmly rests against its intended location.
Now it’s time to move on to filling it with soil!
Filling the Planter with Soil
Now that you have your self-watering planter set up, it’s time to fill it with soil.
Before you begin, make sure the water reservoir is filled with water. This will help ensure that the plant’s roots are able to access moisture as needed.
Once you’ve confirmed that the watering system is in place and functioning properly, add potting soil to the planter until it reaches about an inch below the rim.
Be careful not to pack down the soil too tightly, as this can prevent proper drainage and lead to root rot.
Once your planter is filled with soil, gently pat it down and level it off before moving on to planting your plants.
Planting Your Plants
Now that your self-watering planter is set up, it’s time to start planting! Proper planting is essential for the success of your plants in a self-watering planter.
First, prepare your potting soil by mixing it with water until moist but not saturated. This will help the plant roots absorb water more effectively from the reservoir below.
Next, carefully place your plants into the soil and gently press down around them to secure their position. Be sure to leave enough space between each plant so they have room to grow.
Once all plants are in place, fill the remaining space with potting soil and level off the surface. Finally, check the water level indicator and add water as needed to ensure proper hydration for your newly planted greenery.
As you wait for your plants to thrive in their new environment, consider adding mulch and fertilizer for added nutrition and protection against pests.
Adding Mulch and Fertilizer to the Planter System
Now that your self-watering planter is set up, it’s time to think about how you can keep your plants healthy and thriving. Adding mulch and fertilizer are two important steps in maintaining a successful garden.
Mulch serves as a protective layer over the soil, helping to retain moisture and regulate temperature. It also helps prevent weeds from growing around your plants.
Simply add a layer of organic material like wood chips or straw on top of the soil.
Fertilizer is essential for providing nutrients to plant roots. Since self-watering planters have a water reservoir, it’s best to use liquid fertilizer so that it can easily be absorbed by the roots through the wick system.
Follow the manufacturer’s instructions for proper dosage and frequency of application.
To further ensure optimal growth for your plants, adjusting the watering system may be necessary. This will depend on factors such as the type of plant and weather conditions in your area.
Keep an eye on the level of water in the reservoir and adjust accordingly if necessary.
And, monitor how quickly or slowly the potting mix dries out between watering cycles – this may signal a need for adjustments to the wick length or number used within each planter.
By taking these steps with care and attention, you’ll soon become a master at keeping your self-watering planter successfully nurturing beautiful greenery all year round!
Adjusting the Watering System
Now it’s time to adjust the watering system. The wicking process is what makes these planters so unique and efficient.
However, if the water level is too low, the plants will suffer and eventually die. On the other hand, if there’s too much water in the reservoir, it can cause root rot or attract mosquitoes.
To ensure optimal growth conditions for your plants, regularly check on the water level of your self-watering planter.
Refill as needed but be careful not to overfill. A good rule of thumb is to keep the moist soil at a depth of about 2 inches from the surface. This way, roots can access the water without drowning in it.
With proper adjustments and attention paid to this integral component of your self-watering planter setup, you’ll soon see healthy greenery flourishing within its confines.
As with any living thing, maintaining your self-watering planter requires regular care and upkeep.
In order to prevent mold or mildew buildup caused by excess moisture, consider adding some ventilation holes around the sides or base of your container garden.
Plus, make sure to periodically flush out any accumulated sediment or debris that may clog up your wick system.
By taking these simple steps into account when adjusting and maintaining your self-watering planter setup, you’ll be well on your way toward becoming a master gardener!
Maintaining Your Self-Watering Planter
Now that you have set up your self-watering planter, it’s important to properly maintain it.
One of the most crucial aspects of maintaining a self-watering planter is monitoring and refilling the water level.
As plants grow and consume water, the reservoir may need to be refilled every few days or once a week depending on the size of the container and plant roots.
To refill the water level in your self-watering planter, simply pour water into the designated opening until it reaches the fill line. Do not overfill as this can lead to root rot or mold growth.
It’s also important to check for any clogs or debris blocking the drainage holes at the bottom of your planter which can prevent excess water from draining properly.
With proper maintenance, your self-watering planter will provide optimal growing conditions for healthy plants.
Now that you know how to maintain your self-watering planter, let’s move on to troubleshooting common issues that may arise with these types of planters.
Troubleshooting Common Issues
Now that you have set up your self-watering planter, it’s time to troubleshoot any common issues that may arise.
Think of your planter as a ship at sea; just like how sailors need to constantly check and adjust the sails for smooth sailing, you too will need to monitor and make adjustments to ensure optimal plant growth.
One potential issue with self-watering planters is wicking. If the wick is not properly placed or functioning correctly, water may not be drawn up into the soil effectively.
This can lead to overwatering in some areas and underwatering in others, causing root rot or stunted plant growth.
To address this issue, double-check that the wick is securely in place and consider using a different type of wicking material if necessary.
Moreover, regularly checking the water level indicator can help prevent over- or under-watering by ensuring there is always an appropriate amount of moisture available for your plants’ needs.
Frequently Asked Questions
How Often Do I Need To Refill The Water Reservoir?
Well, it depends on several factors such as the size of the planter, the type of soil and plants grown in it, and weather conditions.
Generally speaking, most self-watering planters can last for 1-2 weeks without needing a refill.
However, it’s always best to keep an eye on the water level indicator or check the moisture level of the soil regularly to ensure your plants are getting enough water.
Remember that overwatering could also harm your plants, so be mindful not to fill up too much water than needed.
With some practice and observation, you’ll master the art of keeping your self-watering planter thriving all year round!
Can I Use Tap Water In My Self-Watering Planter?
The truth is that the answer isn’t a simple yes or no – it depends on your specific situation.
Tap water can be fine for some plants, but others may require filtered or distilled water to thrive.
Also, if your area has hard water with high mineral content, this could potentially harm your plants over time.
It’s important to do your research and test your tap water before using it consistently in a self-watering planter.
By taking the time to understand what works best for your plants, you’ll be able to enjoy healthy and thriving greenery without constant worry about watering needs.
What Kind Of Fertilizer Should I Use In A Self-Watering Planter?
The type of fertilizer you need will depend on what plants you’re growing and their specific nutritional requirements.
You can find fertilizers that are specially formulated for herbs, vegetables, flowers, or other types of plants.
Look for a balanced formula with equal parts nitrogen, phosphorus, and potassium (NPK).
This will help ensure that your plants get all the nutrients they need to thrive.
Remember to follow the instructions carefully when applying fertilizer – too much can be just as harmful as not enough!
With the right care and attention, your self-watering planter can yield beautiful and healthy plants year-round.
How Do I Clean The Watering Tube?
Cleaning the watering tube in your self-watering planter is a quick and easy process that you can master in no time!
First, remove the planting tray from the reservoir below it.
Next, disconnect the tubing from both ends and flush it out with warm water using either a sink faucet or hose. For tough build-up, use a pipe cleaner or bottle brush to gently scrub the inside of the tube.
Finally, reattach the tubing and replace the planting tray.
Voila! Your self-watering planter will be back to efficiently nourishing your plants in no time.
Can I Use A Self-Watering Planter For Vegetables?
Yes, you can definitely use a self-watering planter for growing vegetables! In fact, these planters are perfect for those who want to grow their own fresh produce without having to worry about watering them every day.
Self-watering planters work by storing water in a reservoir below the soil level and using capillary action to draw it up into the soil as needed.
This means that your plants will always have access to the right amount of moisture, which is especially important for vegetable gardens since they require consistent watering for optimal growth.
So go ahead and give it a try – with a little bit of planning and care, you’ll be enjoying homegrown veggies in no time!
Summing Up
In conclusion, setting up a self-watering planter is not as challenging as it may seem. It’s like creating your own little oasis for your plants, where they can thrive without the need for constant attention and care.
Think of it as building a fortress that protects your green friends from wilting away in the scorching sun or getting drowned in heavy rain.
So go ahead and try out this innovative way of gardening! With just a bit of effort, you’ll soon find yourself enjoying lush foliage and blooming flowers all year round.
And who knows, maybe someday you’ll even become an expert on self-watering planters – ready to share tips and tricks with fellow garden enthusiasts.

Leave a Reply